Frequently Asked Questions
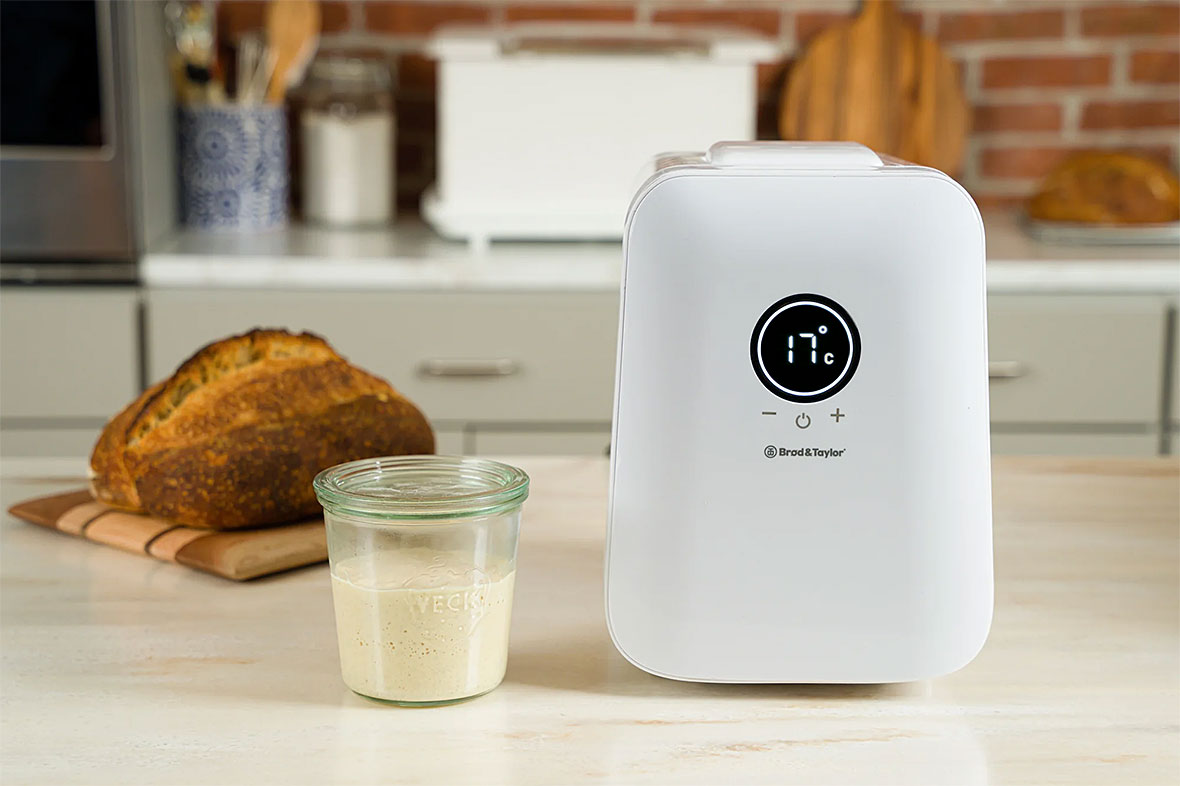
Folding Proofer & Slow Cooker
Two “large” loaves, approximately 2lb / 900 g each of dough. The Brød & Taylor Shelf-Kit accessory will double capacity. Interior space of the Proofer is 14.75 x 12.5 x 8” high / 37.5 x 32 x 20cm high. If overall pan size with rims and/or handles is less than 12 x 14″ – 30.5 x 35.5 cm the pan will fit. For the best circulation of warmth and humidity, place pans towards the center of the Proofer. Many of our customers also purchase supplies from King Arthur Flour. We have a chart of KAF pan sizes that fit correctly in the Proofer and also pans which will not fit in the Proofer. The chart may be helpful when considering a purchase at King Arthur Flour or another store.
Home bakers are often disadvantaged because they lack a well-controlled fermenting and proofing environment. Most bakers understand that great bread requires quality ingredients. However, even with the best ingredients, homemade bread often lacks flavor, texture, and is uninteresting in every sense. This is because bakers are missing the one ingredient they need most: Time at the right temperature. The single step that differentiates great bread from mediocre bread is giving the dough a chance to ferment slowly at the ideal temperature. The Proofer allows you to create the best texture and taste in homemade bread with repeatable and consistent results.
The Folding Proofer is not a bread machine. It is a proofing environment for the fermenting and rising of yeast dough. It eliminates the troublesome temperature and humidity variables that have made it difficult for all bakers–beginners and professionals who bake bread at home. With the Folding Proofer, there is no longer a difficulty finding that “warm, draft free place” in your home for dough to rise. The Proofer makes it possible to bake bread at home with predictable, excellent results. Compared to a loaf made in a bread machine, you will find hand-made bread has improved texture and taste. You still mix your own dough and for some breads knead by hand or with a mixer. You may use your own pans or bake free-form loaves in traditional shapes. Higher-quality, more delicious loaves are made with a temperature-controlled proofing environment and baking in a separate pre-heated oven.
Yes, the Proofer has been tested and approved for unattended operation and may be run continuously. It uses very little electricity, only about 0.03 kwh per hour when set at 75 °F / 24 °C.
There is a range of temperatures that work well for bread dough, and if the recipe or book you are using specifies a temperature, consider using that setting. – Sourdough works well fermenting at a temperature of 80-86 F/ 27-30 C in order to give the wild yeast a boost. – Commercial yeast is more vigorous, so dough made with it benefits from a lower temperature that promotes flavor development, 75-79 F / 24-26 C. – Sweet doughs and croissants often contain butter and do best when temperatures are kept below the melting point of butter. We recommend 80 F / 27 C or lower for these doughs. – Rye flour has weaker gluten and higher enzyme activity. Higher Proofer temperatures are appropriate (80-86 F / 27-30 C) to shorten fermentation time and keep the enzymes from degrading the dough too quickly. – Cold dough that has been retarded in the refrigerator often needs an extra hour (or more per pound / 500g of dough) added to its rising time, to allow the dough to come up to temperature. Ideally, frozen dough should be thawed in the refrigerator before proofing.
The Proofer is calibrated to keep the contents of a jar or bowl at the designated temperature setting, not the air inside. Measuring the air temperature in the proofer with a thermometer will not indicate the temperature of food in a container.
The Proofer is calibrated to keep its contents near the temperature setting, not the air inside. This is because the Proofer heats mainly by radiative heating directly from the aluminum heating plate in the base to the food containers. The air temperature inside the Proofer will become warm, but will not be the same as the temperature of food inside containers. In Proofer mode, items should always be placed on a rack.
There are two important factors that affect the temperature of food in the Proofer:
- Covering a container will raise the temperature of the food inside the container
- Adding water to the tray to create humidity will raise the temperature of food in the container.
The Proofer has been calibrated in two ways:
Humid (with water tray): 70-95 °F / 21-35 °C. Use open containers. Bread dough and preferment in open bowls, loaf, or sheet pans.
Dry (no water tray): 70 -120 °F / 21 – 49 °C. Use closed containers. Commonly used for culturing yogurt. If the Proofer is used in dry mode at 70-95 °F / 21-35 °C food temperatures may be several degrees below the setpoint.
Most dough and shaped loaves do not need to be covered while in the Proofer because the water tray will provide ideal humidity to keep the dough from forming a skin. All bread recipes on the Brod & Taylor website are developed with temperature settings for uncovered dough. If the dough is covered you may find an increased dough temperature of 2-5 degrees depending on the length of time the dough is in the Proofer. However, if using the Proofer for an extended fermentation, such as an overnight pre-ferment at a low temperature, it may be safest to cover the bowl or container.
Fermenting is where the flavours are created and takes much longer than the proofing stage. Fermentation begins when yeast (instant or natural air-borne) is introduced to flour and water. The pre-ferment is a controlled aging process that allows the yeasts to eat at will since there are so few of them at first. Proofing is the final gas production that aerates the dough so it isn’t dense and gummy. Proofing is still fermenting. Sometimes called the final ferment. A single bread dough loaf is bulk fermented after mixing and kneading. After it is shaped it is called proofing or the “final ferment”.
If your Proofer is set to a cooler temp 75 °F / 24 °C, it may not feel very warm to the touch even when it is working properly. To speed rising, set it to 85-90 °F / 29-32 °C. If you have been rising bread in an oven or other area that is quite warm, you may need to set the Proofer temperature higher to obtain similar results. However, the best flavors in bread are usually obtained when the dough is given enough time to rise slowly.
For the best heat circulation and most accurate culturing temperature, avoid placing jars or containers directly in the center of the Proofer. The Proofer will fit eight one quart (1 litre) mason jars without the need to place a jar in the center. For cultures or fermentations that require extended times (>12 hours) more stable results may be achieved in the Slow Cook mode, which may be set as low as 85 °F / 30 °C. Jars or other containers of food can be placed inside a larger flat bottom container (such as a stock pot or aluminum roast pan) and covered with a lid or foil and placed directly on the heating plate. Choose Slow Cook with the Mode button and set the desired temperature.
- Low temperature ovens do not control and hold at the single degree-by-degree temperature level.
- Low temperature ovens do not have proper humidity control The lowest temperature on a low temperature oven can not maintain the very low range of temperatures starting at 70F – 21C temperature.
- Our Proofer is calibrated by engineers to maintain the internal food temperature of the bread dough, yogurt culture, or whatever food is being made in the Proofer. A low temperature oven is set for the air inside the oven, not the ingredients a person is making. The recipes developed by Brod & Taylor have been successfully tested at the specific temperature settings indicated on each recipe.
Yes, there is a thermostat located in the base of the Proofer. The heating element cycles on and off according to the temperature of the aluminum plate. This cycling on and off occurs within a very narrow range, making the Proofer very accurate and reliable at maintaining a steady temperature.
The Proofer has been calibrated for a room temperature of 65 – 70 °F / 18 – 21 °C. The Proofer is only designed to warm its contents, not cool. If the room temperature is above the set point, the Proofer cannot be cooler. If the ambient is very cold – lower than 55 °F / 13 °C, the temperature setting may need to be adjusted a few degrees higher to achieve the desired result.
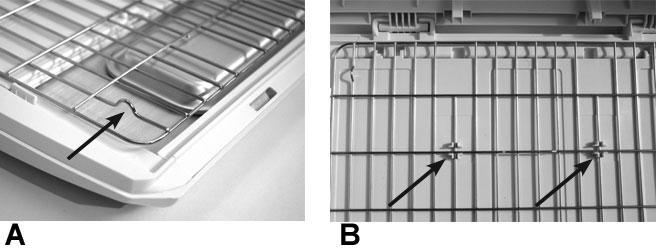
- Make sure the folding sides are collapsed correctly and attached to the hinge at the inside back of the base.
- Ensure the small plastic cross guides are visible on the top
- Place the wire rack with feet UP so it is secured by the cross guides.
Generally, just preheat for 10-15 minutes.
Place the baguettes on a bakers couche placed on a flat pan or other non-absorbent flat support. We cut a full-sized baker’s couche in half so there wasn’t too much fabric blocking the humidity. With the Shelf-Kit accessory two racks of baguettes are an option, so we like having the two pieces of Baker’s Couche for Proofer uses. The couche is lightly floured and never washed. Keep it shaken out after each use and lightly re-flour each time before use. Place the bakers couche on a small flat sheet pan for ease in handling in and out of the Proofer. Flat pans are optimum so you can gently roll each baguette onto a peel. We always warm up the Proofer about 30 minutes prior to proofing and make sure water is in the tray below.
Sticky dough is often caused by over hydration or over proofing. Yeast microbes can’t travel on their own for new food so punching down or degassing does that for them. Under normal conditions there is enough food for the yeast to rise again after at least one punch down and a second rise. Eventually the yeast will eat so much food the dough starts to break down and become really sticky. It is ruined as soon as that starts to occur.
In order to prevent the walls from coming apart, we recommend always leaving them attached to the base of the Proofer in the rear hinges, even during folding and set up.
Here are some pointers for putting them back together:
- Start with the long wall that says “Warning”. Place it in the rear hinges of the base so that the writing is facing the interior of the Proofer.
- Next take one of the short walls and face the raised hinges in the middle of the wall to the outside, or exterior of the Proofer (the smooth side of the hinge should face the interior). The exposed end of the metal pin at the center hinge of this wall should be facing up and the closed end should be facing down.
- To fit the short wall into the long wall, widen the angle formed by the two walls until they are nearly a straight line, then fit the juncture together.
- Once the juncture is fastened, you can put the short wall back to a right angle with the back wall and rest it on the Proofer base.
- Attach the second short wall in the same manner as the first.
- For the last long wall, face the raised middle panel to the interior of the Proofer, then fasten it to one of the short side walls (again, it will be necessary to widen the angle between walls until it is nearly flat).
Finally, to attach the last joint, it will be necessary to form a nearly straight line with the short wall that you are attaching it to, just as you did with the other three junctures. This will be a little tricky with the other three walls already attached. To do this, leave the back wall in the hinges at the back of the base, but lift up the walls at the front of the base so that you can form a nearly flat angle with the two walls that you are trying to attach.
No, operation of the Folding Proofer is silent.
When the Proofer is set up, the lid rests on the walls. It does not click into place or latch. However, there is a specific way to line up the lid so that it fits properly. The two square pegs at the rear of the lid fit into the square-shaped notches at the rear wall, then the lid hinges down onto the walls.
The Proofer has the ability to consume 200 watts. When it is operating it has a duty cycle of about 30%. This means the heater is only using 200W for 30% of the time, depending on the temperature (the lower the temperature the less the time the heater has to run).
If the Proofer was ON 100% of the time it would use:
- 200 watts x 1 hour = 200 watt hour (= 0.2kwh)
But since it is only on about 30% of the time, the actual energy consumption is:
- 200 watt hour x 0.3 = 60 watt hour = 0.06 kWh / hour
In other words, it uses the same energy as a 60 watt light bulb.
Slow cooking mode directly controls your pot temperature though the aluminum plate. This is different from proofing mode, where the temperature of the plate is calibrated to keep your dough, yogurt, or other food at a certain setpoint temperature.
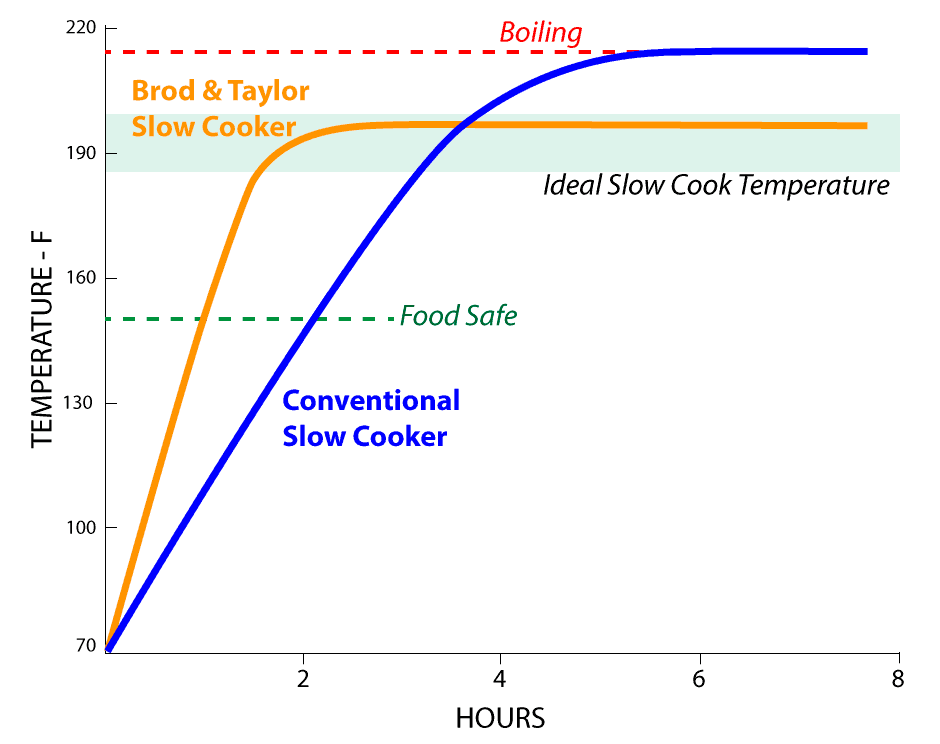
Comparing temperature settings on The Folding Proofer and Slow Cooker to a traditional slow cooker requires some explanation. Most conventional slow cookers (typically with only Low and High settings) actually have no temperature control at all. They heat slowly and continuously until the maximum temperature is reached – usually boiling. This means for much of the time you are slow cooking, your food is actually below or above the actual ideal cooking temperature. With many slow cookers Low and High settings are actually identical. Certain “multi-cooker” appliances with a slow cook function do have temperature control, although performance varies greatly between brands and there is no universal standard for Low or High setting.
Our Folding Slow Cooker uses calibrated temperature control to maintain the selected temperature. You can choose the ideal cooking temperature for your recipe without worrying about over-cooking your food. Temperature settings are most accurate using a stainless steel pot with a flat bottom, but most any type of metal pot can be used. 
Dimensions
Inside (open): 14.75 x 12.5 x 8” high
Outside (open): 18 x 14.5 x 10.5” high
Outside (closed): 18 x 14.5 x 3” high
Weight: 7.5 lbs.
Inside (open): 37.5 x 32 x 20 cm high
Outside (open): 46 x 37 x 27 cm high
Outside (closed): 46 x 37 x 7 cm high
Weight: 3.4 kg

Click on the link below to download the instruction manual for the folding fermenter. The FP-201 model has been replaced by the FP-205.
FP-201
FP-201 Instructions & Recipes (English)
FP-201 Instructions (Français)
FP-201 Bedienungsanleitung (Deutsch)
FP-201 Istruzioni (Italiano)
FP-201 Общая инструкция по пользованию (Русский)
FP-201 Instrucciones (Español)
FP-201 Recipes (Englisch)
Folding Proofer (FP-101): This model has no specific settings for slow cooking. However, most Proofers can still be used for slow cooking by setting the temperature to 120 °F / 49 °C and placing a covered cooking pot directly on the heating base plate. This will be equivalent to the FP-105 in Slow Cook mode with temperature the set at 195 °F / 90 °C.
Folding Proofer and Slow Cooker (FP-205): This model has two temperature modes: Proofer and Slow Cook. The digital display changes to indicate the set temperature for the selected mode. In Proofer mode, food items should always be placed on the rack. In Slow Cook mode, the cooking pot must be place directly on the heating base plate.
Folding Proofer model FP-201 Temperature Setting Cross-Reference Chart
An approximate cross reference guide for using the original Folding Proofer as a slow cooker is provided below. To achieve the temperature in the left column, set the Proofer model FP-201 to the setting in the right column.
Desired Temp FP-201 Use this Setting
195 °F / 90 °C = 120 °F / 49 °C
185 °F / 85 °C = 118 °F / 48 °C
175 °F / 80 °C = 114 °F / 46 °C
165 °F / 75 °C = 110 °F / 43 °C
140 °F / 60 °C = 102 °F / 39 °C
The proofer has passed the most recent and stringent RoHS3 test currently required in the EU (there is no such requirement in the USA). RoHS means Restriction of Hazardous Substances. RoHS3 tests for 10 classes of restricted substances and sets maximum levels. Every single part of the proofer was tested.
RoHS specifies maximum levels for the following restricted materials:
• Lead (Pb): < 1000 ppm
• Mercury (Hg): < 100 ppm
• Cadmium (Cd): < 100 ppm
• Hexavalent Chromium: (Cr VI) < 1000 ppm
• Polybrominated Biphenyls (PBB): < 1000 ppm
• Polybrominated Diphenyl Ethers (PBDE): < 1000 ppm
• Bis(2-Ethylhexyl) phthalate (DEHP): < 1000 ppm
• Benzyl butyl phthalate (BBP): < 1000 ppm
• Dibutyl phthalate (DBP): < 1000 ppm
• Diisobutyl phthalate (DIBP): < 1000 ppm
Test Methods: For heavy metals and flame retardants – Energy Dispersive X-ray Fluorescence Spectrometers (XRF);
For phalates – Gas chromatography and mass spectroscopy (GC – MS).
All tests PASSED with most tests results being below detectable limits.
The majority of large parts of the proofer (white parts) and made from polypropylene (PP). It is one of the safest plastics and also highly resistant to temperature.
(Plastics information From Healthline.com)
Of the commercial plastics on the market today, polypropylene is considered one of the safest. It’s FDA-approved for food contact. Polypropylene is used for food containers such as those that hold yogurt, cream cheese, and butter. Because it has a high heat tolerance, it is often used in packaging of food that can be heated in a microwave.
Some surgical devices and implants are also made of polypropylene, and polypropylene fibers are commonly used to weave area rugs for indoor and outdoor use. Polypropylene, which is derived from petroleum, is considered by the Environmental Protection Agency (EPA) to be a safer choice than some other types of plastics. It’s not known to cause cancer in humans, and it’s less flammable in fabrics than wool.
Is polypropylene BPA free?
Bisphenol A (BPA) is a chemical used in the manufacturing of polycarbonate plastics. It’s also used in epoxy resins that coat the insides of canned goods and water supply pipes. BPA leaches into food and water supplies easily. More than 93 percent of the urine samples examined in a CDC study contained BPA concentrations. Although the FDA has said that small amounts of BPA are safe for humans, some environmental and health experts are concerned that exposure to BPA could lead to problems with brain development, immune function, learning abilities, reproductive disorders, and other health issues.
The growing concern around BPA has led to the production of several types of BPA-free plastics. Polypropylene is one type of plastic that’s free of BPA.
The clear plastic window on the proofer lid is NOT polycarbonate. It is a plastic called SAN. SAN. It is widely used in place of another clear plastic, polystyrene, owing to its greater thermal resistance. SAN is BPA free.
Slow Cooker FAQ
Set to 195 °F / 90 °C. See “About Slow Cooking Temperature” for more information.
Set to 195 °F / 90 °C. See “About Slow Cooking Temperature” for more information. The Brod & Taylor Slow Cooker will hold food at a maximum temperature of 195 – 200 °F / 90 – 93 °C. If you want to simmer or boil to reduce liquid after slow cooking, move the pot to a stove top.
Comparing temperature settings on The Folding Proofer and Slow Cooker to a traditional slow cooker requires some explanation. Most conventional slow cookers (typically with only Low and High settings) actually have no temperature control at all. They heat slowly and continuously until the maximum temperature is reached – usually boiling. This means for much of the time you are slow cooking, your food is actually below or above the actual ideal cooking temperature. With many slow cookers Low and High settings are actually identical. Certain “multi-cooker” appliances with a slow cook function do have temperature control, although performance varies greatly between brands and there is no universal standard for Low or High setting.
Our Folding Slow Cooker uses calibrated temperature control to maintain the selected temperature. You can choose the ideal cooking temperature for your recipe without worrying about over-cooking your food. Temperature settings are most accurate using a stainless steel pot with a flat bottom, but most any type of metal pot can be used.
Different types of food are best cooked at different temperatures. Consult our RECIPES & HOW-TO for additional guidelines. In general, inexpensive cuts of meat like pork butt or shoulder, benefit from higher temperatures to become tender and should be cooked at 195 °F / 90 °C for an extended time. Chicken is best cooked at lower temperatures to maintain moistness. Other possibilities for lower temperatures include slow roasting black garlic at 140 °F / 60 °C or sous-vide cooking in water.
Make sure that you have removed the rack from your Proofer. The pot must sit directly on the aluminum heating base plate. Food temperature in the pot will vary somewhat depending on the type of pot. Temperature settings are most accurate using a stainless steel pot with a thick base and flat bottom.
Folding Proofer (FP-201): This model has no specific settings for slow cooking. However, most Proofers can still be used for slow cooking by setting the temperature to 120 °F / 49 °C and placing a covered cooking pot directly on the heating base plate. This will be equivalent to the FP-205 in Slow Cook mode with temperature the set at 195 °F / 90 °C.
Folding Proofer and Slow Cooker (FP-205): This model has two temperature modes: Proofer and Slow Cook. The digital display changes to indicate the set temperature for the selected mode. In Proofer mode, food items should always be placed on the rack. In Slow Cook mode, the cooking pot must be place directly on the heating base plate.
Folding Proofer model FP-201 Temperature Setting Cross-Reference Chart
An approximate cross reference guide for using the original Folding Proofer as a slow cooker is provided below. To achieve the temperature in the left column, set the Proofer model FP-201 to the setting in the right column.
Desired Temp FP-201 Use this Setting
195 °F / 90 °C = 120 °F / 49 °C
185 °F / 85 °C = 118 °F / 48 °C
175 °F / 80 °C = 114 °F / 46 °C
165 °F / 75 °C = 110 °F / 43 °C
140 °F / 60 °C = 102 °F / 39 °C
110 °F / 43 °C = 85 °F / 29 °C
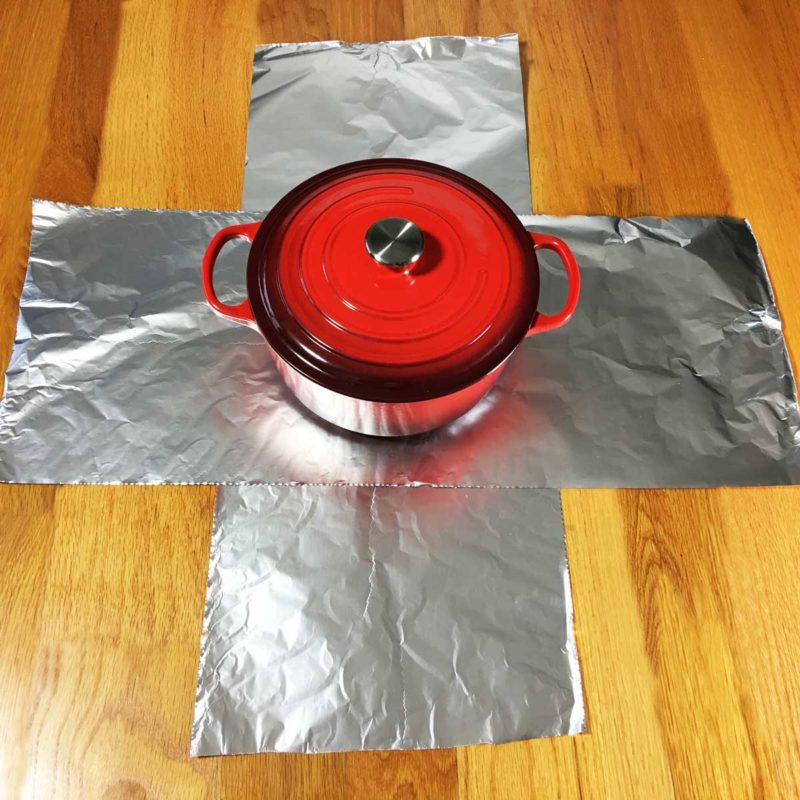
Temperature settings will be most accurate using a stainless steel pot with a thick flat base. The best choice will have some type of heat conductive metal in the base such as aluminum. All Clad ™ stockpots are among our favorites, but there are many other brands. It is possible to use cast iron Dutch ovens, either bare or porcelain coated, but these pots may be 10-15 °F / 5-8 °C below the temperature setting at the highest temperatures. To achieve the highest temperature in a cast iron Dutch oven wrap it in a single layer of aluminum foil to greatly reduce its heat loss. Porcelain enameled cast iron Dutch ovens will get as hot as stainless steel pots if they are wrapped in aluminum foil.
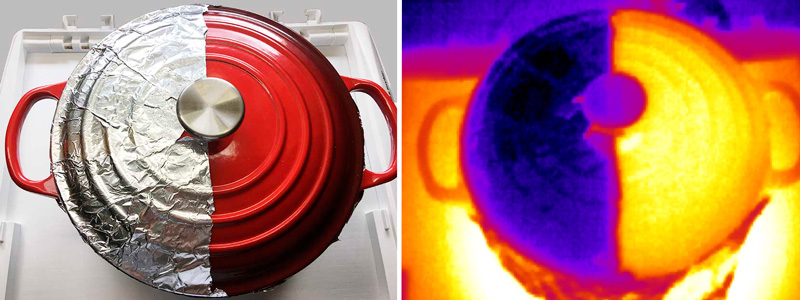
The photographs above are of the same pot. The one on the right was taken with an infrared camera. In this photo on the right side of the pot, where there is no aluminum foil wrap, you can see tremendous emissivity of thermal heat (thermal heat energy loss). When using a recipe where a high temperature of 195 °F / 90 °C is indicated (as in pork recipes), wrapping an enamel-coated cast iron pot or a cast iron & glass-top pot with one layer of foil on the sides and pot lid will allow the internal temperature of the pot to rise. If the temperature is set to 195 °F / 90 °C the Proofer & Slow Cooker will not allow the internal contents of the food to rise above 195 °F /90 °C.
One easy method is to place 2 pieces of foil on a flat surface with the pot in the middle and then wrap to cover the pot and lid.
Slow cooking should always be done in a metal pot. Ceramic crocks and ramekins do not conduct heat well and will not reach the temperature set point.
There is no specific limit on how long the Folding Proofer & Slow Cooker may be run. Most slow cook recipes will take a maximum of 10-12 hours. Slow roasting black garlic will take up to four weeks at 140 °F / 60 °F. The Folding Proofer original model FP-201 can also be operated for weeks and months at a time.
You may reduce the temperature setting to 160 °F / 71 °C to safely hold food at a warm temperature. As an extra precaution, we suggest that you double check the temperature of the food to ensure that it is above 150 °F / 66 °C. Always keep a tight fitting lid on your cooking pot inside the closed Folding Proofer & Slow Cooker.
The top and sides may be removed to use the Proofer & Slow Cooker as a warming tray. Do not remove the sides until they are folded towards the back of the Proofer. Then lift up and release the folded sides from the rear hinge. Also remove the rack and water tray. Removing the pot lid may allow food to cool below the Proofer set point.
Use the same times recommended for cooking on LOW in a conventional slow cooker.
Slow cooking is normally done with some liquid in the pot. However, in certain recipes, liquid comes mainly from the meat as it begins to cook. Consult the specific recipe for details.
The Folding Proofer & Slow cooker is approved for unattended use and can be used overnight. Please be sure to follow all safety instructions in the Instruction Manual whenever using this appliance, and especially when it is used unattended.
When slow cooking, food should reach 140 °F / 60 °C in less than 2 hours. For this reason, frozen meat should never be placed directly in a pot for slow cooking. For best results and increased food safety, we recommend searing thawed meat. Not only does this improve the flavor but also pre-heats the pot you will use for slow cooking.
Do not immerse the base unit in water if the unit becomes soiled, instead use a soft cloth with a bit of water to remove the spill. As a preventative measure before using the Proofer, you can place a piece of aluminum foil on the base plate beneath the pot so that any spill is easy to collect and discard.
The original Folding Proofer (FP-201) and the Folding Proofer & Slow Cooker (FP-205) models use a similar heating system. The key difference in the new Slow Cook model is the added ability to directly select the Slow Cook temperature and a further improved temperature accuracy.
Temperature Setting Cross-Reference Chart
To achieve the temperature in the left column, set the Folding Proofer (FP-201) to the setting in the right column.
90C = 49C
85C = 48C
80C = 46C
75C = 43C
Sahara Dehydrator FAQ
The Sahara Dehydrator is engineered to operate unattended. Internal thermal controls protect against overheating due to a malfunction. As with all electrical appliances, the dehydrator should be used on a hard flat surface. Do not block any air intakes or exhaust on the back, underneath or top. Never store items on top of the dehydrator. Do not operate near flammable liquids or vapors.
The Sahara Dehydrator has two independent heating circuits of 375W each (750 total). The fan uses very little electricity. In normal operation, the heating circuits turn on and off to maintain temperature and low humidity. Typically the energy consumed over a full cycle of dehydration is less than 0.4 kWh/hr. The cost of electricity varies greatly around the world. In the USA this is $0.04-0.05 USD per hour of use. In Germany this is about € 0,12 per hour of use.
The digital timer can be set up to 99 hours. At the completion of the set time, both the heater and fan will switch off automatically. Additionally, a second time can be set to run after the first time is complete (Dual Time / Temperature Mode).
You can pause operation at anytime during dehydration by pressing the PAUSE button. When paused, you can adjust time remaining and temperature settings. Press the PAUSE /START button again to restart operation.
The Sahara Dehydrator comes in two models: one with stainless steel wire shelves and one with poly plastic shelves. The stainless steel shelves are completely dishwasher safe. Poly plastic shelves can be washed in dishwashers up to 167°F / 75°C. Most household dishwashers operate below this temperature.
None of the materials used in the Sahara Dehydrator contain BPA. Food comes into contact with the shelves only. Shelves are available in stainless steel (high quality food grade series 304) or food safe polypropylene plastic. The ABS plastic enclosure is also BPA free. For the ultimate in food safety we recommend using the stainless steel shelves. Sahara Dehydrator drying mats (available separately) are made from high quality silicone and are food safe even at high temperatures. No PTFE materials (such as Teflon®) are used in any Sahara Dehydrator components or accessories.
Drying or “dehydrating” food is a method of food preservation that removes enough moisture from the food so bacteria, yeast and molds cannot grow. Dried foods are tasty, nutritious, lightweight, easy to prepare, easy to carry and easy to use. Low humidity, low heat and good air circulation are critical for successful drying. Once dry, store foods in a dark, cool location in containers that keep out moisture and insects.
Meat can be safely dried in the SAHARA dehydrator by following a few common sense precautions. When handling raw meat, follow strict cleanliness procedures. Keep meat cool prior to placing in the dehydrator. Dry meat at a setting of at least 160F / 71C. At the completion of drying, meat will achieve an internal temperature equal to the setting. Some studies recommend heating red meat to 160F / 71C and chicken to 165F / 74C BEFORE dehydrating, because food contaminants may become more heat resistant after drying. However, this technique alters the texture of the dehydrated meat that some may find objectionable. Educate yourself by reading more about meat drying on sites such as:
Evaporation causes cooling. We all experience this cooling of the skin when getting out of a pool or a shower, or the more significant cooling that occurs when water evaporates from wet clothing. Wet food drying in the dehydrator is cooled by this effect. Actual food temperature may be up to 35F / 20C lower than the temperature setting. As the food dries and evaporation stops the temperature of the food will rise to the setting on the dehydrator. To control the temperature of the food through the entire drying cycle, use the Dual Time -Temperature Mode.
The Sahara Dehydrator creates the ideal conditions to evaporate moisture from the surface of wet food. Ultimately, the time required for the food to fully dry is controlled by how long it takes for all the water in the interior of the food to migrate to the surface so it can evaporate. Certain techniques can speed drying times, but often at the expense of flavor and texture. The easiest way to speed drying is to prepare thin slices of food. But very thin food slices may not be as enjoyable to eat. Raising the dehydration temperature will also speed drying, however, if the temperature is too hot a skin may form on the surface of the food that slows down the drying process.
In the initial stage of drying, food may be as much as 45°F / 25°C below the air temperature setting. In most cases, you can safely raise the temperature by this amount for the first several hours of drying to decrease drying time.
Humidity of the air, quantity of food in the dehydrator, moisture content of the food and altitude can affect drying time.
There are many factors that affect drying times. The relative humidity of the air in the room where the dehydrator is used will affect drying time. Food will dry slower when the humidity is high (more water vapor is in the air slows evaporation). The temperature of the room and altitude can also affect drying time.
Store dehydrated food in sealed containers in a cool dark area. Vacuum sealed bags are excellent for storage.
Sahara drying mats are food-safe silicone. They are excellent for sticky foods, liquids, fruit leathers, or small items such as berries, nuts, seeds or herbs that might fall through the grating of standard shelves.
The Sahara Dehydrator is carefully designed to optimize airflow and circulation with the air filter in place. Additionally, operating the dehydrator without a filter can draw dust and debris inside the fan and heater. It is very difficult to clean the fan or heater and may cause damage.
Air filters from vacuums and other appliances may degrade the performance of the dehydrator. Only authentic Brod & Taylor Sahara Dehydrator filters should be used.
The air filter can be used continuously as long as it is clean. If the filter cannot be cleaned or is damaged it should be replaced. Filters are available from authorized Brod & Taylor Sahara distributors.
Hold Start/Pause button 2 seconds to Enable/Disable Mute Mode. In Mute Mode the completion beep is silenced.
Sourdough Home
The Sourdough Home can both heat and cool. The Folding Proofer cannot cool meaning it cannot bring its contents below room temperature. For example, even though the temperature range of the proofer is 21 – 49°C (70 – 120°F) if the room temperature is 25°C (77°F) the Proofer will not be able to bring its contents to 21°C (70°F). The proofer is larger than the SD Home and can accommodate a large mixing bowl, bread pans, or other containers used when proofing bread dough. The Sourdough Home is smaller and designed specifically with sourdough starter in mind and can accommodate up to a 1 liter/1 quart jar.
The health and growth rate of a sourdough starter are heavily influenced by feeding schedule (frequency) and temperature. To maintain a healthy starter ready for baking, many bakers store their starter at room temperature and refresh on a daily basis. Room temperature can fluctuate throughout the year and fermentation activity can become unpredictable and difficult to manage. Bakers often need to adjust feeding ratios and frequency to accommodate for these temperature swings. With the Sourdough Home, you can keep your starter at a consistent temperature year-round. No need to adjust ratios or feeding schedule.
Weekend bakers may not want to feed their starter everyday- it is unnecessary and wastes a lot of flour. Often, bakers store their starter in the refrigerator as an alternative to feeding daily. However, refrigerator temperatures hover around 38°F (3°C) which is too cold for the yeast and bacteria in starter. When it is time to bake, one must give the refrigerated starter a few refreshments to get it up to full strength ready for baking. Using the Sourdough Home to store your starter is the perfect solution. By keeping your starter cool, but not cold you can slow down fermentation, while not bringing it to a complete halt. Your starter will be healthy and ready to use without additional feedings.
With the SD Home, you can create a starter feeding schedule that works for you. Feed your starter once a day, every three days, or even once a week. Precise control over a wide range of temperatures allows you to manage the fermentation rate of your starter like never before and provides the ability to control when your starter peaks. Time to peak at various temperatures will depend on seed ratio, hydration level, and type of flour used. Experiment with your own starter to get desired results.
Use our guideline below to get started.  *Above guidelines are based off of a 100% hydration starter fed with all-purpose flour.
Because the display only has 2 digits, the highest temperature setting in Fahrenheit is 99°F. The Sourdough Home can go higher but will need to switch to Celsius in order to read the setting. To switch from F to C press both + and – at the same time and hold for 2 seconds.
The amount of time it will take depends on two factors- the amount of starter and the discrepancy in temperature between your starter and the set temperature of the Sourdough Home. To shorten the time it takes for your starter to reach the desired temperature, mix it with water close to the set temperature of the Sourdough Home. If set to a warm temperature, mix your starter with warm water, and if set to a cold temperature, mix your starter with cold water.
In order to test the temperature of the Sourdough Home, we recommend using a probe thermometer inserted directly into your starter after it has been in the unit for several hours. We do not recommend setting an indoor thermometer inside the Sourdough Home.
A kitchen counter works well. Just be sure to avoid locations with extreme temperature variations, such as directly next to an oven, and to store it out of direct sunlight. The rear air vents should also be given a few inches of clearance for adequate airflow.
Still have questions?
Please Contact us and we’d be happy to help!
 Select Country